| Version 1 (modified by , 15 years ago) (diff) |
|---|
Table of Contents
Using the Data Import Wizard
We provide an example data set to demonstrate how to use the data import wizard here ( download) This zip file contains an example dataset with the following components:
Annotations:
- individuals.txt
- markers.txt
- metabolites.txt
- species.txt
- strain.txt
Meta:
- investigation.txt
- publication.txt
- data.txt
Data:
- data/genotypes.txt
- data/metaboliteexpression.txt
See XgapFormatTutorial on how to create such files. Note that for the data wizard you don't need 'data.txt', 'investigation.txt' and 'contants.properties' because these are created for you by the wizard.
The following steps will result in a succesfull import:
Step 1: Configure your import
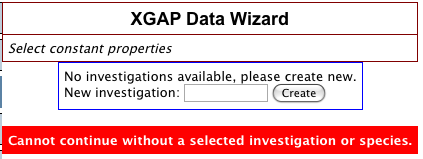
You will see the following screen when you start the import wizard with empty XGAP database:
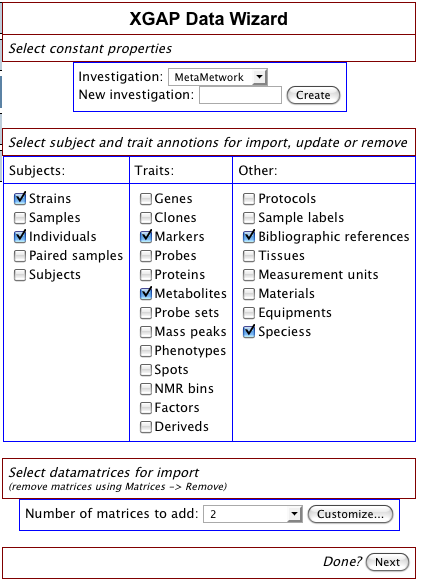
In box 1: Select constant properties
- Create a new investigation called "MetaMetwork". Use "New investigation:" -> "Create".
In box 2: Select subject and trait annotations for import, update or remove
Tick the following boxes:
- Individuals
- Markers
- Metabolites
- Species
- Strain
- Bibliographic reference
In box 3: Select data matrices for import
Use the dropdown box to select "2".
Since we are adding the annotations, we use the default settings of matrices that include auto detection of the dimensions of your data, that is, what is denoted by the row headers and column headers in your data matrices. Based on available annotations XGAP tries to guess a suitable 'data.txt' as described in XgapFormatTutorial for you. In this case the guessed dimensions of the matrix should be rowtype='markers' x coltype='individuals' and in case of metabolite expressions this wil be rowtype='metabolites' x coltype='individuals'.
Should the guessing fail (for example, your matrix contains both numbers and text data, the wizard guesses 'decimal', and it errors later on) you can always go back and set corrections manually.
The screen should look like this:
Note: if there were already investigations present, the startup screen would have looked like this. To add the data to investigation 'MetaNetwork', you would still had to create it first. Newly created investigations are directly selected in the dropdown list.
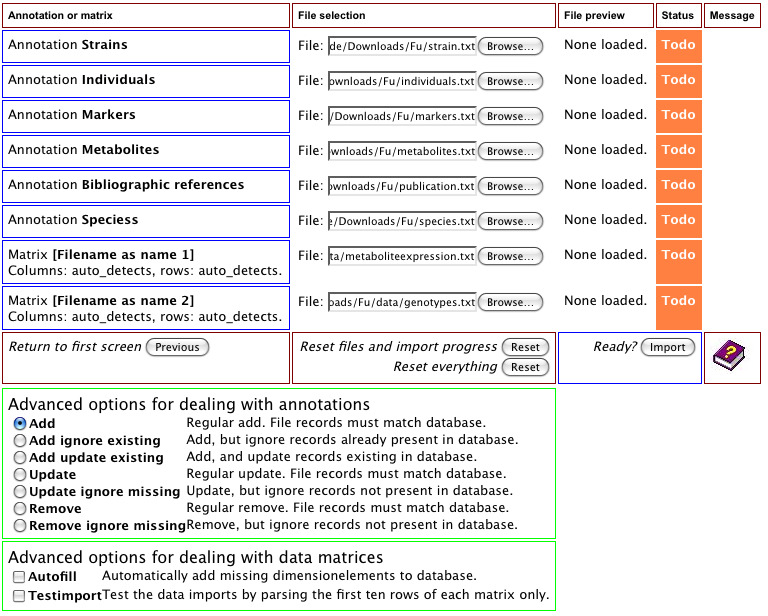
Step 2: Import the data files
After configuration of you import, you will see the a screen that allows you to choose the files to be imported. For each of the provided options browse to the files as shown. Then push import.
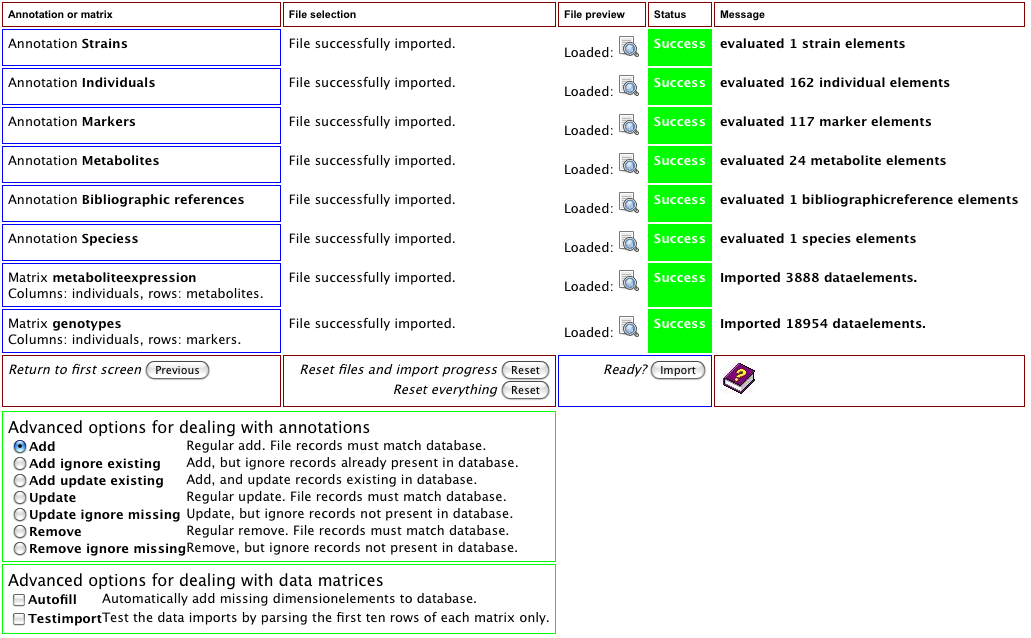
Step 3: Inspect results
When succesful you will be shown a report of the import. If any file contains errors or is inconsistent then informative errors will be shown. An example result:
Attachments (4)
- wizard1.png (14.9 KB) - added by 16 years ago.
- wizard2.png (51.1 KB) - added by 16 years ago.
- wizard3.png (122.8 KB) - added by 16 years ago.
- wizard4.png (141.7 KB) - added by 16 years ago.
Download all attachments as: .zip


